Tuesday 17 June 2014

Piping Tilda's Apron


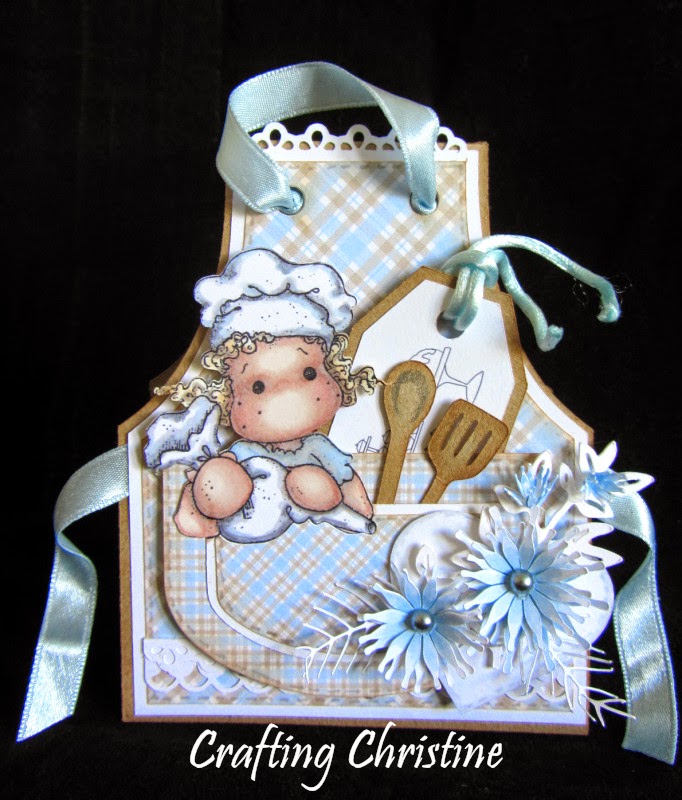
I decided on a shaped card for my 'Piping Tilda' image & so have her popping out of one of the pockets of an apron, cut using my Silhouette Cameo.  That particular pocket is actually paper-pieced so that it fits around the piping bag shaping perfectly. The two pockets, plaid aprons (there is one on the inside too) & all the kraft shapes have inked edges. The checked dps also have 'stitching' added using a fine Promarker nib before being layered up to include lacy ''broderie anglaise'  borders (the one towards the bottom is a double layer of 2 designs), again cut using my Cameo. Tilda herself was coloured using my Promarkers but I kept the image on the front of the tag (which goes into the larger pocket) without any colour so it didn't detract from the main image. That image of a row of cakes is from Beyond the Fringe & on the reverse of the tag is a simple 'birthday wishes' sentiment.

I love making flowers but can never make up what my favourite style & design is. These ones were given Promarker-ed petals & pearly centres before being set on a heart-shape - again this shape was given an inked  & 'stitched' edge.


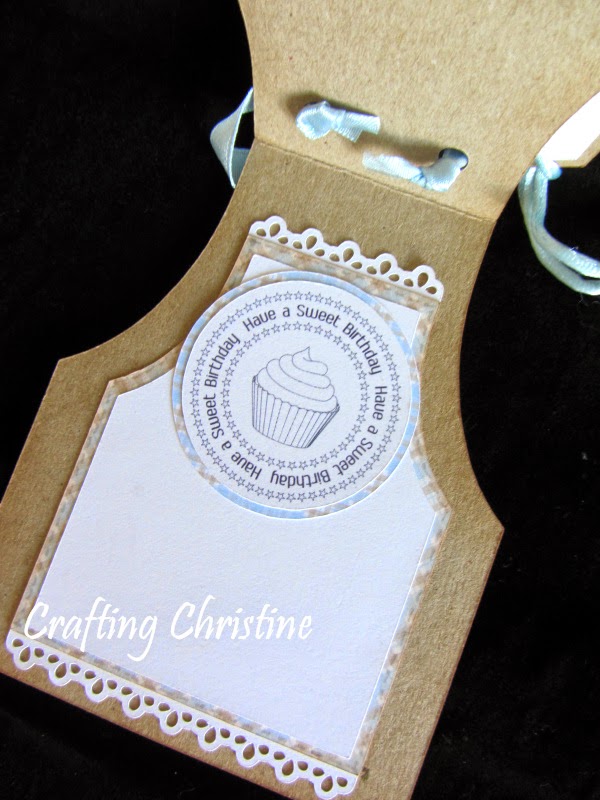
The inside of the card echoes the apron design & 'lace-work' and features a circular sentiment from Bird's Cards.


Tine :)


Challenges:

Divas By Design - anything Magnolia
Stamp & Create with Magnolia - Spring Fancy Folds
Inky Chicks - special shapes
Tip Top - shaped card
Bunny Zoe - layers
Crafting For All Seasons - don't be square
Sweet Stamping - say it with flowers
Crafty Calendar - petals & pearls
Craftitude - flowers &/or lace
Craft for the Craic - something summery or with flowers
Bloggers Challenge - flowers
Marvelous Magnolia - punches
Gem of A Challenge - gingham papers or ribbon
Ink On My Fingers - patterned paper
Savvy Handmade Cards - mad about plaid
Delicious Doodles - stitch it
We Do Doobadoo - ribbon
Whimsy - tic tac toe (ribbon, flowers, sentiment)
Craft Your Passion - 3 or more embellishments
Crafty Bloggers - bingo (die-cut, ribbon, pearls)
Crafty Ribbons - anything goes (with ribbon)
Inky Impressions - for the girls
Crafty Hazelnut's Patterned Paper - anything goes (with pattern paper)
Penny's - anything goes
Word Art Wednesday - anything goes
Creative Cutting - anything goes (using cutter).

Friday 6 June 2014

Father's Day Award


This card is for my Father-in-law, my own father having passed away a number of years ago now. Firstly, I created a dual-layered rosette using my Cameo - (the orange paper does have a pattern to it but it doesn't show!) and I used my glue-gun to secure the folds together, setting the folded 'circles' onto circular bases making them very sturdy before adhering together and adding the centre-pieces. I used the glue gun for it's immediate 'grab'  - necessary for the 'jumpy' nature of a concertinaed circle.  The 'DAD' banner, again evidence of the Cameo again, created by welding the chosen font onto the created frame-work and a similar-sized banner placed behind it to form a navy base layer  - with another cut from orange spotted paper for the other 'ribbon' of the rosette.


Following the design layout at MOJO, I then created the required 'rounded-off' square giving this a chevron design using all the colours suggested by ColourQ. I chose the orange colour as the main 'pop' not just because it is 'bright & happy' but also because it is the team colour of Blackpool's football team, the team he supports. The extended version of this shaped layer was embossed using the chevron embossing folder from Die-sire Embossalicious in white card.  I think that all the white gives the card a very clean, crisp fresh look & really sets off the given colourway. Hope he likes it!

Tine :)

Challenges:
Mojo Monday - design sketch
Simon Says... - Father's Day / Masculine
CRAFT - father's day / male
Moving Along With The Times - father's day
Fab 'n' Funky - father's day / for the men in your life
Bearly Mine - one for the boys
Country View Crafts - only men allowed
Crafts 4 Eternity - for the boys
QKR Stampede - father's day
Crafty Catz - inspired by a song ( Luther Vandross - Dance With My Father...still miss my own father after all this time)
Aud Sentiments - any sentiment for a guy
Dies R Us - one for the boys / father's day
ColourQ - colour palette
Addicted to CAS - texture
As You Like It - favourite embossing technique (dry embossing)
Paper Mill June challenge - anything related to a June celebration
A Creative Romance - anything goes (optional birthday)
Crafty Hazelnuts Patterned Paper - anything goes using patterned paper
Corrosive 200 Celebration - anything goes.

Friday 30 May 2014

Twins are Three - CAS Tilda


CAS cards are always a bit of a challenge for me. Finding the correct amount of 'less is more' really does exercise my 'little grey cells'! LOL.

An angled photo which hopefully is picking up some of that sparkle & shine & that bit of dimension too.
I 'sat' my image of Tilda (who has been given a paper-pieced dress), on the rectangular name plates applicable for each of the twins. Each Tilda, coloured with Promarkers has also been given a little hair-bow ribbon of a slightly different shade of pink (well with identical twins it helps everyone know who is who!!! LOL).  Tilda & her accompanying name-plate & pink mat were added onto each card using glue gel.  Both cards were then given the all-important number denoting their age - well, you think you are big when you are 3 don't you! LOL.


Each number consists of 2 layers, the top one was given a healthy dose of sparkle using Crafter's Companion Spray & Sparkle and the off-set layer beneath given a more than healthy dose of Crafter's Companion Spray & Shine. Dimension was given to the numerical layers with more glue-gel. The fronts were then finished off with 3 gems each - I made sure each was well stuck down just in case the twins started to 'pick at' them..... you have to think of these things don't you with little'uns.


I created a sort of replication on the inside of the cards, this time adding a circular numerical image from Cindy Close to the larger platform each Tilda sits on.  I have also coloured Tilda on the inside of cards, this time using subtle grey shades, again using Promarkers.


Thanks for stopping by,

Tine :)

Challenges:
Magnolia-licious - birthday (using Magnolia, Wee Stamps or Wild Rose Studio images)
Stamp & Create with Magnolia - CAS
Lexi's - happy birthday
Brown Sugar - birthday
Squirrel & Fox - let's hear it for the girls
Stamping for the Weekend - for the girls
Sparkles Forum - celebrate mum or special lady -  2 special little ladies :)
Paper Crafting Journey - perfect in pink
Use Your Stuff - bling
Everybody Art - bling bling
Sweet Stamping - sparkle and shine
Crafty Bloggers Network - pink with ribbon
A Creative Romance - girly
CCEE Stampers - include a number
Magnolia-mania - paper piecing
CRAFT - paper piecing
Tilda Town - use your stash ( hammered card as bases, narrow ribbon 'in hair', gems )
Ribbon Girls - May Magnolia - Magnolia stamp +ribbon
OSAAT - anything goes
Crafty Catz - anything goes
Corrosives 200 celebration - anything goes

Thursday 22 May 2014

Tilda with Daisy


I think it is safe to say, I haven't quite got doilies out of my system yet! LOL.  Not a new Tilda, I know, but she is an adorable image just the same isn't she? I coloured her with Promarkers and layered her up with more cut-files than I would like to count - not to mention a couple of coordinating papers. The flowers and 3 different types of leaves were also coloured using Promarkers - hard to tell on the daisies I know once I had finished bending them into shape, but each petal does in fact have markings on it too and their centres were also given colour using Promarkers to tone in with the papers (hence the orange & red colours too, not just the yellow). The sentiment on the front was from Sentiments4You.

Lots of layers & lots of dimension.

As I had chosen to lay the fancy borders so they would protrude down the sides of the card's front and onto the reverse, they were decorative on that side too. This meant I needed just a shorter version along the top edge of the inside of the card to maintain the decorative edging. I have probably not explained this very well .... LOL. Repeating the same two design papers on the inside, I kept it all relatively simple using a sentiment from Artistic Whispers and a 'frame' to write in later, embellished a couple of golden 'gems', like the ones on dotted onto the card's front.

Tine :)
The decoration on the inside of the card.


Challenges:

Magnolia-icious - sunny yellows
Lovely Hanglar & Sweet Magnolia - use a sentiment    
Dutch Magnolia Lovers - Spring/use flowers  
Dies R Us - May Flowers
Passion for Promarkers - use your dies (+ Promarkers)
Whimsy - 2 or more die-cuts
Hanna & Friends - dies
Die Cuttin' Divas - happy birthday
Crafty Sentiments - inspired by a song ( Daisy, Daisy)
Squirrel & the Fox - let's hear it for the girls
Die-cut Divas - use at least one embellishment
Feeling Crafty - one for the girls/ladies
Seize the Birthday - anything birthday goes (optional tag)
613 Avenue Create - anything (+optional twist of 3 shapes)
Artistic Inspirations - anything goes /dies or punches
4 Krafty Girlz - anything goes
I ♥ Promarkers - anything goes (using Promakers/Letraset markers).

Friday 16 May 2014

Bunny Cupcakes Shaped Card


Still on a bit of a 'doily-kick' at the moment but this time I refrained from making the doily into the card base going for a more 'regular' crafting use.  Thought it went with the cupcake image (Bunny Cupcakes from LOTV) quite well as that is the traditional use of a doily - to pretty up your cake plates. :)  As is usual with my colouring, I used Promarkers and I have hopefully made the bunny two-some nice 'n' fluffy. However, I have paper-pieced their little outfits, the little one having lilac gingham, the other a dotted design.

That touch of dimension......
I created the card base shape using my Cameo software, along with the plethora of accompanying layers. I have tried to 'be good' & not put too much dimension on my card using 'flat' flowers as embellishment. Well, compared to most of the flowers I add these are flat, but as you can see, these have been added using glue gel along with the image's mat and that of the sentiment.  Couldn't resisit......I do love that bit of dimension.  LOL. The simple sentiment on the front is also a LOTV stamp and its tag given a couple of pretty ribbon tails.


The layers on the inside replicate the shape of the ones on the front but this time the sentiment is one I created myself on the PC to work in conjunction with the one on the front, recolouring the text to match the papers. The image of the cake display running along the bottom of the sentiment mat is from Beyond The Fringe.

Gotta love those bunnies!

Tine :)


Challenges:
Ribbon Girls (May Lili challenge) - pearls + use a LOTV image/ribbon or lace
Tuesday Throwdown - Spring blossoms
Cupboard Trilogy - flowers
Bearly Mine - flowers
Sieze the Birthday - flowers + birthday
Incy Wincy - birthday
Animal Friends - birthday (with animals)
As You Like It - fur or feathers - & why (fur.....far more cuddly!)
Feeling Crafty - one for the ladies
Flat Friends - dies/punches
Simon Says.... die crazy
Craftitude - use a die
Whimsy - 2 or more die cuts
Crafty Creations - use at least 2 from flowers, die-cut, ribbon, purple
Creative Moments - anything goes (optional bingo - flower, sentiment & more than 2 layers)
Crafty Hazelnut's Patterned Paper - anything goes
Crafts Galore - anything goes.


Sunday 11 May 2014

Pink Confection


Undeniably 'girly' to the point of perhaps being uber-feminine, this card sees me using my Promarkers & Cameo again. The image, 'Hepburn Dress', is from A Day for Daisies and in this soft pink colour scheme (chosen from the Live & Love challenge), reminds me of a chic ballerina - but this is probably more to do with one of the layers being the colour of satin ballet shoes than the shape of her dress alone.  The image's mat peeks through the layer immediately above it - this text-printed layer having an oval cut-out and the edges of it inked before being set on the card using foam pads.

The fortnightly challenge at a Day for Daisies suggests use of a doily (&/or twine too)  and for my interpretation I have gone for a whole doily-based card shape and the lace work is echoed in the central white border running just above the floral bouquet. Two of the flowers used for embellishment were cut from single-sided card so that the white core peeking out would hopefully give a softer and more delicate feel - in keeping with those of the photo inspirational picture I thought.


On the inside there are just a couple of layers. This time 2 ovals were cut from pink- text paper before being given inked edges and a sentiment from Bird's Cards added beneath one of them. As you can see, I just couldn't resist adding a couple of pink pearls to the flourishes - the same ones giving the butterfly it's 'body' on the card's front. I will write in the other oval cut out at a later date.

As ever, thanks for coming by my blog today.


Tine :)

Challenges:
Live and Love Challenge
Live and Love - photo inspiration
A Day for Daisies - use a doily and/or twine
Bearly-Mine - flowers
4 Crafty Chicks - flowers
Simon Says.... - spring flowers
Crafting For All Seasons - layers
Alphabet - G is for gorgeous gowns
Graph'It - let's go pink
Divas By Design - pink
In the Pink - add a butterfly (+lots of pink!).

Sunday 4 May 2014

Two of a Kind


Hi all. This is a set of two almost matching cards, the main difference really is in the welded text on the front - one a 'speedy recovery' with the other a named birthday card.   I used a few different fonts in both lower-case & upper-cases at random before welding onto a rectangular frame. Another difference? If you look closely the placement of the central layers is just that little less angled on the Sharon's card- not by much, but just enough to alter the whole balance of the card. This was rectified by adding the blue pearl - balance restored. :)

Yes, that Cameo has been particularly busy again, evident in every layer in the card. I chose papers with spring-like colours which would peep through the 'petal' cut borders before embellishing with different rolled-flowers in card to match the coordinating papers. I love creating flowers & these all have one thing in common, they are all rolled up to form them though the white & blue ones were quilled (petals on a straight line, so to speak) whilst the yellow more rose-like looking ones were petals on a 'swirl'. Possibly badly described but I am sure you know what I mean, LOL.  I kept these particular flowers more 'basic', choosing not to put too much dimension into each petal/leaf etc as I thought it suited the format of the lace borders more.

The back of the each card has a similarly cut border along the bottom but the inserts were, perhaps quite understandably, a little different considering the different reasons for sending. However, both have the names of the recipients printed in a similar way to the welded font on the front of the card - in different style fonts in different sizes.


The first (following a friend's operation), features a sentiment from TLC - to gently remind the recipient to take things a bit easy following the op with an image to suit it and the second card, again having a paper insert, uses an image from DZ Doodles called ' Garden Song' along with another sentiment kindly shared by Paulette at TLC sometime ago.


Tine :)

Challenges I wish to enter are:
Crazy4Challenges - flowers
Stamping with the Dragon - flowers
Laurelcraft/Dragonfly Dreams - how does your garden grow?
Mema's Crafts - May flowers or celebrate mom
CRAFT - make your own embellishments (flowers)
Little Red Wagon - DIY flowers
Sugar Creek Hollow - tic tac toe - (bottom line - flowers, pearls, die cuts)
Fussy and Fancy - Spring colours (kept the choice to just white, yellow, blue & green for a 'fresh' feel
Simply Create Too - stack 'em up
Delightful - add dimension
Flat Friends - dies/punches
Crafty Hazelnut - patterned paper (3 coordinating papers)
Moving Along with the Times - pastel colours
Penny's - pastel colours
Die Cuttin' Divas - make it girly
Crafty Girls - anything goes
Crafting at the Weekend - anything goes
Word Art Wednesday - anything goes.


Saturday 26 April 2014

Girly Get Well


Using the sketch over at Crafts & Me this month I created a 'get well' card for my MIL. The only variations were the shaped card base and the central shape (with the addition of an extra border horizontally at the middle) . The elements of it - the 'cross' of papers, fancy corners and the square & floral arrangement etc are all there - but look a little different with a shaped ground.

The image of the little girl 'nurse'  is by the talented Mo Manning and was coloured using Promarkers as were the pink flowers & blue branches. Hopefully this has added subtle variation to the 'petals' as well as ensuring everything matches of course.


Just a few couple more layers on the inside the card and I incorporated a circular sentiment by 'redcardcorner' into a shortened border and to its centre I added a pink printed version of the butterfly so it matches the one on the front of the card.


Thanks for coming by,

Tine :)

Challenges I wish to enter this card for:
Crafts & Me - sketch
Wags'n'Whiskers - lots of layers
Corrosive - pretty pastels
I ♥ Promarkers - hats (& use Promarkers!!!)
Addicted to Stamps - make your mark (Promarkers)
Crafty Little Fairies - furry friends
In the Pink - digital delight + lots of pink! (image & Silhouette Cameo)
The Squirrel & the Fox - die cut or punch
Divas By Design - let's go to the movies (Get Well Soon with Courtney Cox)
Word Art Wednesdays - anything goes (using scripture/uplifting quote).